3.2 Port Facilities and Artificial Islands
3.2.1 Setting and Soil Conditions.
The main port facilities in Kobe harbor are located primarily on reclaimed land along the coast and on two man-made islands, Port Island and Rokko Island, which are joined by bridges to the mainland (Figure 3.1). The liquefaction and lateral spread-induced damage to harbor structures on the islands disrupted nearly all of the container loading piers, and effectively shut down the Port of Kobe to international shipping. All but 6 of about 187 berths were severely damaged.
Port Island was constructed in two phases; only Phase I is shown in Figure 3.4. Phase I, consisting of 436 ha was completed in 1981 after 15 years of filling and construction operations. Located on the island are port facilities, wharves, container yards, high-rise apartments, an amusement park, warehouses, and commercial buildings. The filling for Phase II, which consists of a 390-ha area extending directly to the south of the area shown in Figure 3.4, began in 1986. Completion of construction of Phase II facilities was scheduled for 1996. Rokko Island has an area of 580 ha. Filling began in 1972, and reclamation was completed in 1992. Land use on Rokko Island is much the same as on Port Island.
 Figure 3.4: Map showing layout of facilities located on the older part of Port Island; at the time of the earthquake, an extension of the island was being developed south of the southern seawall shown on the map (Fudo Construction Corp., Ltd., 1995).
The fills beneath Port and Rokko Islands were constructed using residual soil formed by weathering of granite (Masa soil), which was obtained from borrow sites in the Rokko Mountains and brought to the site through a combination of conveyor belts and barges. This soil is collapsible in its natural state and its grain size distribution varies depending on the degree of weathering. The general ranges of grain sizes reported for the decomposed granite fills beneath Port and Rokko Islands are shown in Figure 3.5. Beneath Port Island, the Phase I fill usually has a maximum grain size between 2 mm and 40 mm, a mean grain size between 0.2 mm and 6 mm, and a fines content between 5 percent and 30 percent. These grain-size characteristics indicate a material that is well graded, rather coarse, and which contains a significant fraction of gravel. Although the fines content is somewhat low, deposits from sand boils that erupted to the surface contained layers of very fine material which was slimy and difficult to walk on. The Phase II fill beneath Port Island and the fill beneath Rokko Island are generally similar to the Port Island fill, except that material from the Kobe Group, a layered Miocene sediment, was mixed with the decomposed granite. Accordingly, the latter fills are characterized by higher fines contents than the Phase I fill beneath Port Island (Matsui, 1994).
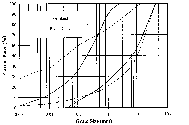 Figure 3.5: Representative ranges of grain sizes for fill materials beneath Port and Rokko Islands.
Owing to the low strength and sensitive character (sensitivity of about 8 to 10) of the soft alluvial clay on the sea bottom, a 2 to 3 m thick uniform coverage of the bottom was completed before dumping the fill in 3 to 4 m thick steps across the site. Barge dumping continued to 2 m below the water surface, above which end dumping from conveyor belts was used. Surface compaction was used for the upper few meters.
A typical soil profile for Port Island, with some relevant soil properties, as given by Nakakita and Watanabe (1981), is shown in Fig. 3.6. Some variations in thickness of the different strata exists across the islands. Borehole logs plotted on Figure 3.6 show that SPT values, N, range between 5-10 blows/30 cm. (It is important to note that the average SPT energy used for the drill rigs in Japan is about 75 percent of nominal, whereas the US energy efficiency is about 60 percent. Thus, the N-values used in empirical correlations should be taken as about 1.2 times the measured values after correction for overburden pressure). The soil profile beneath the Portopia Hotel, shown in Figure 3.7, is typical of Port Island sub-surface conditions. The diluvial sand and gravel layer is equivalent to the interlayered sand and clay layer shown in Figure 3.6. This is the bearing layer for pile foundations on the island. The conditions on Rokko Island are very similar (Figure 3.8), and blow counts from several boreholes are shown in Figure 3.9. These blow counts are somewhat higher than those measured beneath Port Island; nevertheless, the distributions of liquefaction effects was generally similar.
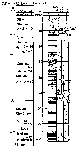 Figure 3.6: Soil condition and standard penetration test data from a site on Port Island (Nakakita and Watanabe, 1981).
 Figure 3.7: Foundation conditions under the Portopia Hotel on Port Island.
 Figure 3.8: Foundation conditions under a high rise building on Rokko Island.
 Figure 3.9: Data from site investigations on Rokko Island.
Detailed site specific liquefaction studies were conducted for some projects on Port Island prior to the earthquake. These studies applied a procedure similar to the "simplified procedure" of Seed and Idriss (1982) for estimating effective cyclic shear stress ratios, (/(, which were thought to be likely during anticipated earthquakes. The estimated peak ground acceleration used in these studies was 0.15 g, and the duration corresponded to that expected from a magnitude 8+ earthquake. Critical accelerations determined from cyclic triaxial tests, for durations corresponding to a magnitude 8+ earthquake, were determined to be about 0.2 g. Recent test data show somewhat smaller critical accelerations for normally consolidated fill (Figure 3.10). On the basis of the anticipated ground motions, the sites were judged to have adequate resistance to liquefaction. However, as noted below, accelerations measured during the earthquake were much larger than these pre-earthquake estimates.
 Figure 3.10: Liquefaction resistance of Port Island fill at various overconsolidation ratios (provided by N. Yoshida, Sato Kogyo, Ltd., Japan).
3.2.2 Ground Motions.
Ground motions during the earthquake greatly exceeded the design motions for Port Island. Motions recorded at a site in Kita Koen Park are tabulated in Table 3.1. This locality is on Port Island, not far from the bridge to Kobe Ohashi, and is in an area disturbed by surface effects of liquefaction.

Table 3.1: Maximum Accelerations in Gals Recorded near Kita Koen Park, Port Island
The time histories at the four depths for the N90(E component were already shown in Figure 2.24. These records indicate that the onset of strong ground shaking began about 5 seconds into the record, and the strong motions were effectively complete by 17 seconds. The records also indicate that ground motions on the fill surface were greatly modified compared to records registered at greater depths. These records indicate that as liquefaction occurred, large shear stresses could be transmitted through the liquefied zone. As a consequence, accelerations attenuated and fundamental periods lengthened at the surface compared to motions recorded below the liquefied layer. N-values in the fill at this location ranged between 5 and 10 blows/30 cm, which are typical values for liquefiable parts of the island. Thus, it was not surprising that liquefaction occurred at this and other areas of Port Island since the recorded peak accelerations below the liquefied layer were about four times the design accelerations and the surface accelerations were about two times the anticipated values, despite the effects of liquefaction.
3.2.3 Damage to Port Structures and Adjacent Facilities.
In general, the seismically induced liquefaction resulted in pervasive lateral spreading around the margins of the islands and mainland port areas, and in ground settlement within the interiors of the islands. Figure 3.11 gives a partial listing of damaged areas on Port Island and also shows areas of improved ground which are further discussed in Chapter 4. At many localities lateral spreads pushed quay walls, used for berthing of ships, outward as much as several meters, with average displacements of 2 to 3 m (Figure 3.12). A typical quay wall section consists of a caisson, concrete box structures, up to 15 m wide and 20 m deep, with two or more interior cells (Figure 3.13). These caissons were towed to the site, submerged in position to form the wall, and then the interior cells backfilled with sand to form the quay.
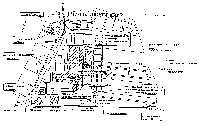 Figure 3.11: Damage assessment of Port Island (Phase 1) and zones of ground improvement by sand compaction piles.
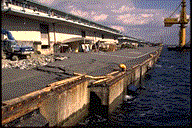 Figure 3.12: Example of lateral displacement of older quay walls on Port Island.
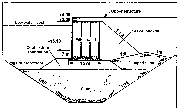 Figure 3.13: Typical cross section of a quay wall, foundation construction and backfill (after ENR, January 30, 1995).
Depressions and grabens, as deep as 4 m and as wide as 30 m, formed pervasively behind the quay walls, and lateral spreading caused ground fissures parallel to the walls as far as 200 m inland. Unfortunately, nearly all of the major cranes used for transferring containers and other freight to and from ships were located within the graben or lateral spread zones. These structures were pulled apart at their bases by lateral ground movements and tilted by the subsidence. Supporting crane rails were also displaced and deformed (Figures 3.14 and 3.15). The extensive damage to the giant cranes was particularly evident on Rokko Island (Figure 3.16). The outward movement of the sea wall by as much as 3 m spread the crane legs off the wheel bogeys and, in a few instances, led to collapse of the cranes (Figure 3.17). In other instances, the movement led to deformation of crane legs and formation of plastic hinges above or within the horizontal brace (Figure 3.18). The consequences of the loss of the port facilities is dramatically illustrated in Figure 3.19 by the large number of vans and trucks ready for export before the earthquake, which were trapped in the flooded settled areas behind the displaced sea wall.
 Figure 3.14: Graben caused by lateral displacement of the quay wall on Port Island. Note the cranes straddling the graben and the lateral deformation of the crane rails.
 Figure 3.15: Crane rail on Port Island that settled into graben behind quay wall.
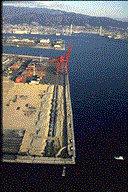 Figure 3.16: Air view of damaged quay walls and port facilities on Rokko Island. Quay walls have been pushed outward by 2 m to 3 m with depressed areas called grabens 3 m to 4 m deep forming behind the walls.
 Figure 3.17: Collapse of crane due to lateral movement (~2 m) of quay wall on Rokko Island. Note settlement of 1-2 m also occurred behind wall.
 Figure 3.18: Buckled or plastically yielded crane legs due to about 2 m of spreading between crane rails as a consequence of lateral caisson displacement.
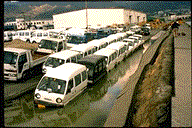 Figure 3.19: Vans and trucks ready for shipment before earthquake. Lateral spreading caused 1.5 m-2 m drop of paved surface and local flooding.
3.2.4 Specific Observations of Port and Quay Wall Damage.
Kawasaki Heavy Industries. A Kawasaki Heavy Industries facility is located on the mainland waterfront south of the Harbor Land ferry terminal, as shown in Figure 3.1. The quay walls around one large warehouse were displaced laterally and settled vertically enough to drop the apron slabs below the water level and to severely tilt a large crane beside the warehouse (Figure 3.20). Damage also occurred to quay walls, warehouses, and crane facilities south and north of the warehouse.
 Figure 3.20: Quay walls around a large Kawasaki warehouse displaced laterally and vertically enough to drop apron slabs below the water level and tilt large cranes.
Tsukiji-cho and Hyogo Pier. Tsukiji-cho and the Hyogo Pier are located on the mainland waterfront south of Kawasaki Heavy Industries and to the west of Port Island (Figure 3.1). Without exception, all quay walls around the full perimeter of the Tsukiji-cho were damaged to some degree. The most spectacular quay wall failures were at the eastern ends of Hyogo Piers No. 1 and No. 2. At these piers, the quay walls displaced sufficiently to bring the warehouses and surrounding apron slabs below water level: The end of Pier No. 1 is shown in Figures 3.21 and 3.22, and the end of Pier No. 2 is shown in Figures 3.23 and 3.24. Similar quay wall damage occurred on the west side of Tsukiji-cho, just north of the land-bridge to Nakanoshima, as shown in Figure 3.25.
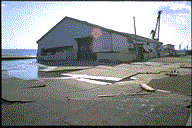 Figure 3.21: Damage to the end of Hyogo Pier No. 1.
 Figure 3.22: Damage to the end of Hyogo Pier No. 2.
 Figure 3.23: Damage to the end of Hyogo Pier No. 2.
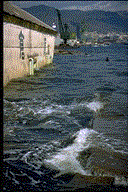 Figure 3.24: Damage to the end of Hyogo Pier No. 2.
 Figure 3.25: Damaged quay wall on west side of Tsukiji-cho.
Karumojima-cho. Karumojima-cho is an island located about 4 km west of Port Island (Figure 3.1). Quay walls along both sides of the channel on the north side of Karumojima-cho were extensively damaged by liquefaction-induced lateral deformations. Deformations were often sufficient to drop the walls and apron slabs below water level, as shown in Figures 3.26 and 3.27. Associated damage also occurred to structures located along the channel, such as the crane shown in Figure 3.26. Damage to a tank farm located near the northwest corner of Karumojima-cho is described in Section 3.5.
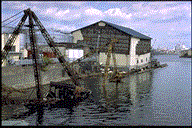 Figure 3.26: Channel on north side of Karumojima-cho (looking east).
 Figure 3.27: Channel on north side of Karumojima-cho (looking west).
Of particular interest was the observed range of quay wall performance along the channel to the west of Karumojima-cho, which corresponds to the channelized mouths of the Karumo and Minato Rivers. The quay walls extending north and east from the southwest corner of Karumojima-cho experienced relatively small amounts of deformation. Differential lateral displacements between individual quay wall blocks were generally less than about 10 cm in this area. These sections of the quay walls were protected by buttresses of reinforced concrete rip-rap, as shown in Figure 3.28. Across the channel to the west is Minami-Komaecho, which is adjacent to the Port of Nagata. The quay walls on the southern side of Minami-Komaecho (Figure 3.29, looking west from the southeast corner), were also buttressed by reinforced concrete rip-rap and experienced differential displacements between individual quay wall blocks that were generally less than about 10 to 15 cm. The quay walls on the eastern side of Minami-Komaecho (and facing Karumojima-cho), shown in Figure 3.30 (looking north from the southeast corner), were not buttressed by rip-rap and suffered both vertical and lateral displacements of 1 to 2 m. Ground cracking and sand boils were observed in the area behind these quay walls. This performance indicates that buttressing with reinforced concrete rip-rap had a beneficial restraining effect on wall movements at this location. The relatively good performance of buttressed quay walls was in sharp contrast to the large deformations of the non-buttressed quay wall. This difference in behavior warrants additional study. Similar beneficial buttressing was noted at Piers A, B, and C, at Maya-Futo (described below), except that in these instances the buttressing effect was through a pile-supported relieving platform.
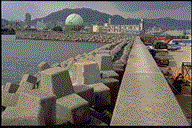 Figure 3.28: Dolos bittressed quay wall along west side of Karumojima-cho.
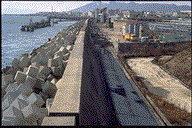 Figure 3.29: Dolos buttressed quay wall along south side of Minami Komaecho.
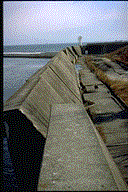 Figure 3.30: Quay wall along east side of Minami-Komaecho.
Onohama-cho. Onohama-cho is located north of Port Island (Figure 3.1). The quay walls at the south end of Shinko Pier No. 5 (the largest southward-extending pier) were severely deformed, dropping the foundation for a crane and much of the surrounding apron slabs below the water level. An aerial view of this damage is shown in Figure 3.31. The channel to the north of Onohama-cho was ringed with displaced quay walls and associated damage.
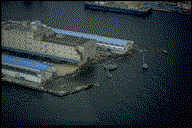 Figure 3.31: Pier No. 5 on Onohama-cho.
East Bank of the Maya-ohashi Bridge (Harbor Expressway). The Maya-ohashi bridge on the Harbor Expressway spans a channel between Onohama-cho and Maya-Futo north of Port Island. The eastern end of this bridge is elevated above a spit of land extending off Maya-Futo. Severe lateral spreading and differential settlements occurred on both the north and south sides of this spit beneath the Maya-ohashi bridge. On the north side of this spit, the outward displacement of a quay wall created a large graben and dropped a large truck halfway into the water (Figure 3.32). Differential settlements of roughly 1 m occurred around the piers of the elevated highway in the middle of this spit, as illustrated in Figures 3.33 and 3.34. These photographs also show the severe damage to the reinforced concrete bridge piers.
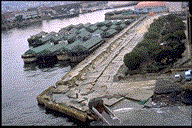 Figure 3.32: East bank of Maya-ohashi bridge: north side.
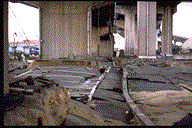 Figure 3.33: East bank of Maya-ohashi bridge: beneath elevated roadway.
 Figure 3.34: East bank of Maya-ohashi bridge: south side.
Maya-Futo. Maya-Futo is located to the north of Port Island, east of Onohama-cho (Figure 3.1). The quay walls for the four piers extending southward from the mainland were designed with strong pile foundations to resist seismic loading. An aerial view of the western-most pier (Figure 3.35) shows extensive cracking in the asphalt pavement and sand ejected by liquefaction across the entire pier. Quay walls at the southeast corner of this western-most pier were the most significantly deformed, with large gaps between quay wall blocks. Elsewhere, however, the quay walls experienced relatively little deformation.
 Figure 3.35: Aerial view of western piers on Maya-Futo.
One of the piers at Maya-Futo was rebuilt in the late 1980s. The reconstruction was in three sections: A, B, and C in order from the seaward end of the pier to the landward end. These sections were designed to a nominal 0.25 g horizontal acceleration, which was unusually high for the port of Kobe. There was no observable damage at either sections B or C of this new pier complex and, at the time of the site visit, a container ship was tied up at section C and clearly handling cargo (Figure 3.36).
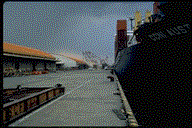 Figure 3.36: Undamaged Section C peir at Maya-Futo.
Section A is a pile-supported structure built in front of the old seawall, leaving the old wall in place. The new berth is 10 m wide. The harbor bottom is at -10.3 m. The harbor bottom was excavated and backfilled with gravel to an elevation of -13.0 m; the excavated area extended about 12 m in front of the new wall. A single row of very tightly spaced vertical piles were driven 1 m back from the front of the new wall, terminating in the harbor bottom sand at elevation -21.5 m, or slightly more than 10 m below the mudline. A distance of 3.5 m behind this row of piles another row of vertical piles was driven. These were spaced 3.0 m on center and driven to approximated elevation -19 m. A further 3.5 m behind this row, another row of vertical piles was driven, again 3.0 m on center but terminating at approximately elevation -20 m. Immediately next to each of the latter piles a batter pile was driven at an inclination so that the tips of the batter piles terminated at about an elevation of -20 m at points and very near to the tips of the second row of vertical piles. The space behind the new wall and between the piles was filled with gravel up to elevation -1.5 m. The old quay wall, its sand backfill, and the piles supporting the old relieving platform were left in place. The pavement over the old section was heavily damaged during the earthquake, but the new platform and pavement showed no distress.
Sections B and C were constructed as concrete caisson structures. Both sections have four cells. At section B, each cell is 3.25 m in width and filled with gravel. The width of the foundation slab, at the base of the caisson, is 17.4 m. The caissons are founded on a gravel backfill that was placed in a trench excavated into the harbor bottom sands. Trench depths varied from -13 m to -14 m, but the top of the gravel fill was consistently at elevation -10.3 m. Because the harbor bottom at this section is a little deeper than elevation -10.3 m, the backfill rises slightly above the sea bottom. The crest of the backfill extended some 5.5 m in front of the new wall.
The widths of the caisson cells in Section C are 3.825 m each, and the bottom mat is 19.70 m wide. The foundation trench for this caisson was excavated to elevation of -14.3 m and backfilled with gravel to an elevation of -12.8 m, which is just below the natural harbor bottom. The backfill extended about 3 m in front of the new wall.
Higashi-Kobe Ferry Pier. The Higashi-Kobe Ferry Pier is located on the mainland to the north of Uozaki-Hamacho, as shown in Figure 3.1. This ferry pier includes four different berths with loading ramps for automobiles and passengers. The eastern two berths were inspected and, at both berths, the quay walls were displaced outward and large grabens formed that were 6 to 10 m wide and 2 to 3 m deep. The ramps for the east-end berth straddled the graben, were torn apart, and had collapsed (Figure 3.37). The columns supporting the inboard side of these ramp structures were apparently supported by groups of one to four piles. The exposed piles were approximately 30-cm-diameter steel pipe piles. Pile caps were dislodged from the supporting piles in several locations, as shown in Figures 3.38 and 3.39. The exposed piles were generally hollow, although some were partially filled with concrete. Embedment of piles into the pile cap appeared limited, with no apparent connecting steel ties, dowels, or other strengthening details.
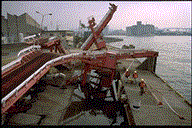 Figure 3.37: Ramp structure at Higashi-Kobe ferry pier.
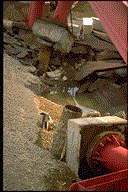 Figure 3.38: Pile caps for ramp structure at Higashi-Kobe ferry pier.
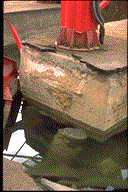 Figure 3.39: Pile caps for ramp structure at Higashi-Kobe ferry pier.
The inboard columns of the damaged ramp structures and the graben behind the displaced quay wall east of the terminal building were apparently supported by piles, in groups of four. These piles were approximately 35-cm-diameter steel pipe piles filled with concrete with some vertical reinforcing steel connecting the pile to the cap. The damage to the pile-to-pile-cap connection in the exposed piles at this location is shown in Figure 3.40. Overall, the damage to the pile foundations of the loading ramps at the-Higashi-Kobe Ferry Pier was clearly a consequence of severe lateral displacement of the surrounding ground. This poor behavior contrasts with the good performance of pile-supported structures where liquefaction led to ground settlement, but not to large lateral ground deformations. This better behavior is described following section.
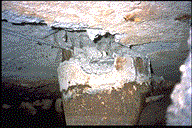 Figure 3.40: Damaged pile to pile-cap conection at Higashi-Kobe ferry pier.
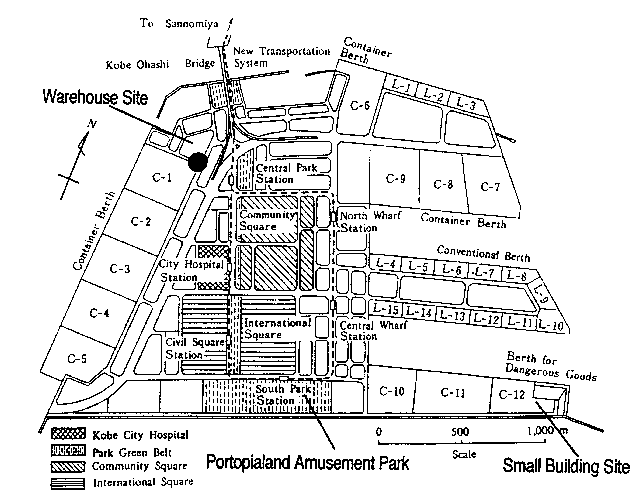 Figure 3.4: Map showing layout of facilities located on the older part of Port Island; at the time of the earthquake, an extension of the island was being developed south of the southern seawall shown on the map (Fudo Construction Corp., Ltd., 1995).
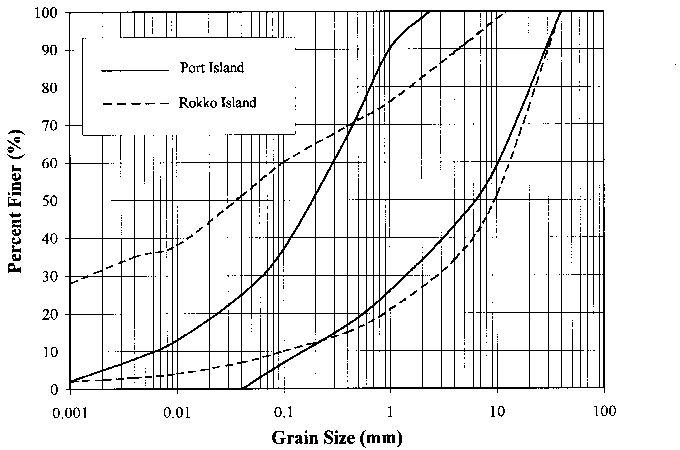
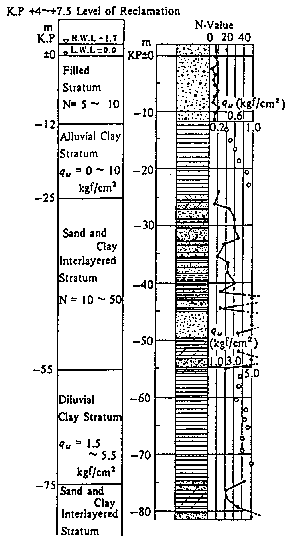 Figure 3.6:
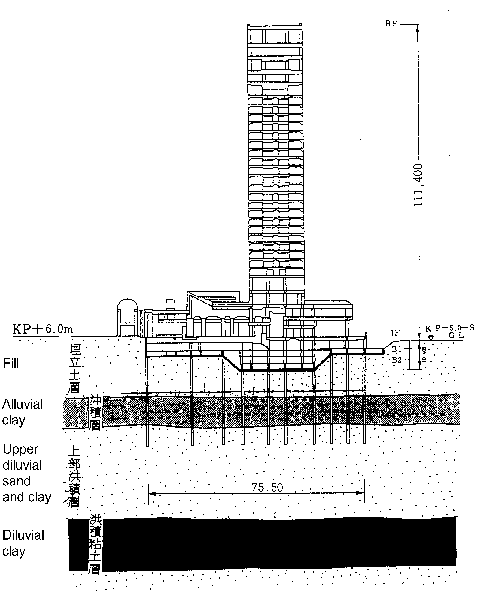

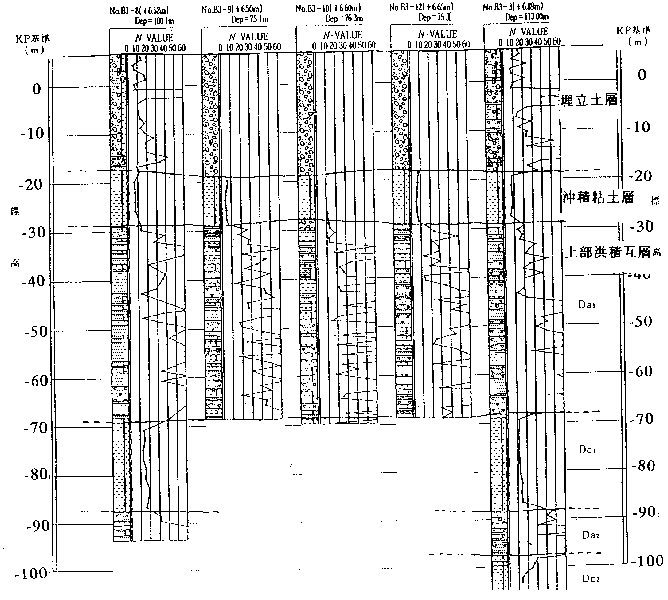 Figure 3.9:
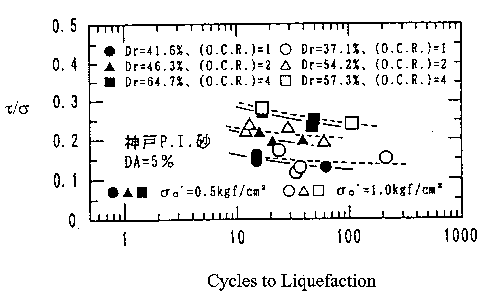
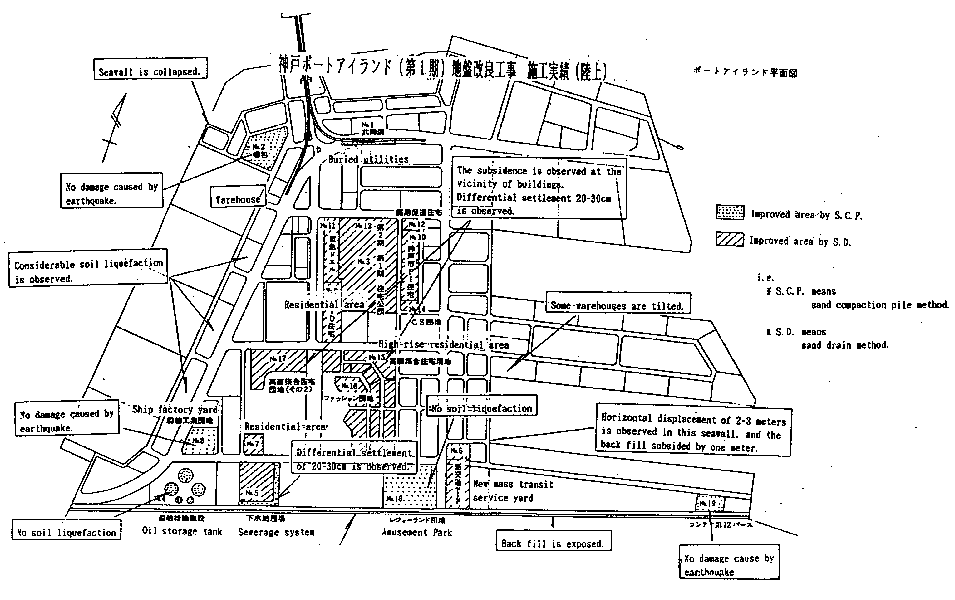
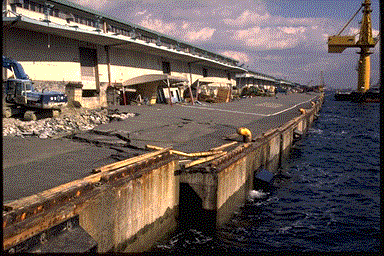


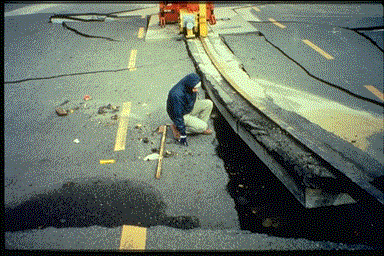

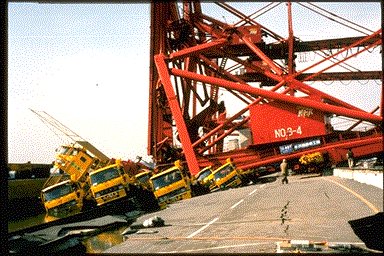
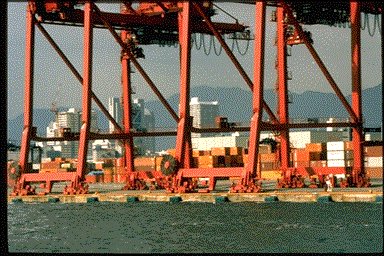
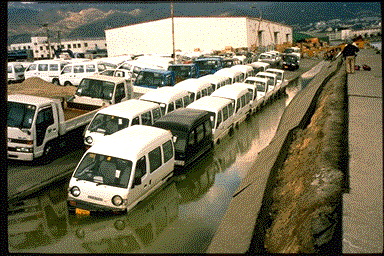
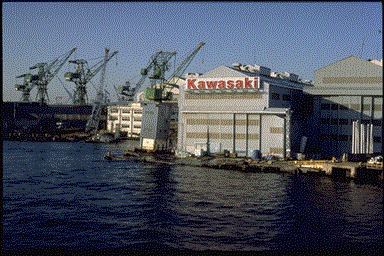

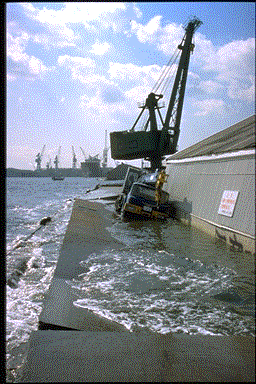

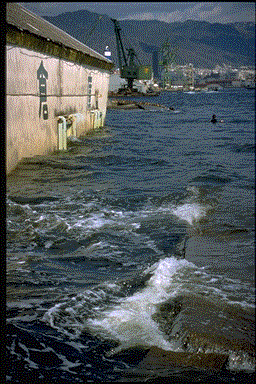

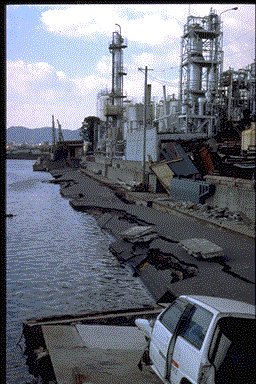
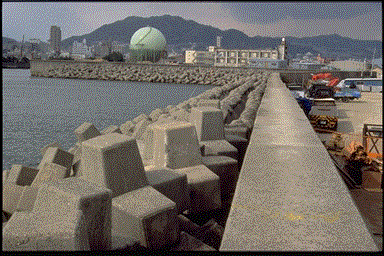

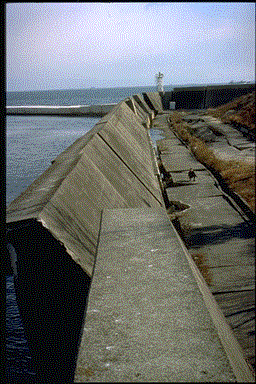
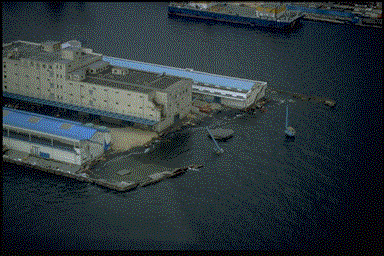


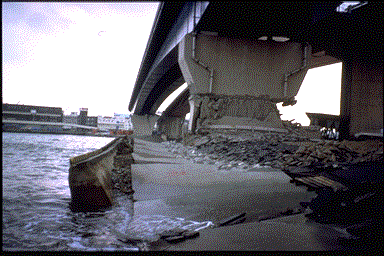

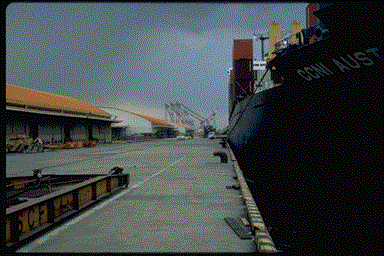
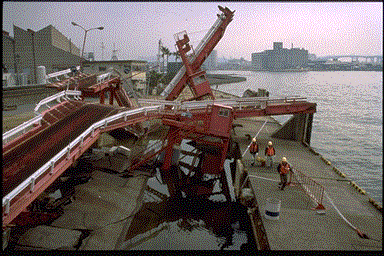
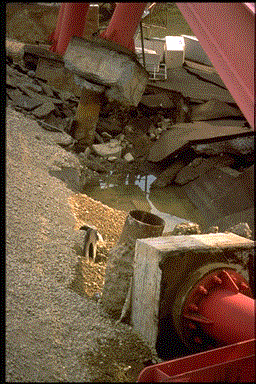

 Figure 3.40: